![]()
IATI.cloud extracts all published IATI XML files from the IATI Registry and stores all data in Apache Solr cores, allowing for fast access.
IATI is a global aid transparency standard and it makes information about aid spending easier to access, re-use and understand the underlying data using a unified open standard. You can find more about the IATI data standard at the IATI Standard website
We have recently moved towards a Solr Only version of the IATI.cloud.
If you are looking for the hybrid IATI.cloud with Django API and Solr
API, you can find this under the branch
archive/iati-cloud-hybrid-django-solr
You can install this codebase using Docker. Follow the Docker installation guide for more information.
IATI.cloud is the primary data source for AIDA.tools.

Running and setting up is split into two parts: docker and manual. Because of the extensiveness of these sections they are contained in their own files. We’ve also included a usage guide, as well as a guide to how the IATI.cloud processes data. Find them here:
| Software | Version (tested and working) | What is it for |
|---|---|---|
| Python | 3.11 | General runtime |
| PostgreSQL | LTS | Django and celery support |
| RabbitMQ | LTS | Messaging system for Celery |
| MongoDB | LTS | Aggregation support for Direct Indexing |
| Solr | 9.8.1 | Used for indexing IATI Data |
| (optional) Docker | LTS | Running full stack IATI.cloud |
| (optional) NGINX | LTS | Connection |
Disk space: Generally, around 600GB of disk space should be available for indexing the entire IATI dataset, especially if the json dump fields are active (with .env FCDO_INSTANCE=True). If not, you can get away with around 300GB.
RAM: Around 20GB of RAM has historically proven to be an issue, which led to us setting a RAM requirement of 40GB. Here is a handy guide to setting up RAM Swap
For local development, only a limited amount of disk space is required. The complete iati dataset unindexed is around 10GB, and you can limit the dataset indexing quite extensively, you can easily trim the size requirement down to less than 20GB, especially by limiting the datasets.
For local development, Docker and NGINX are not required, but docker is recommended to avoid system sided setup issues.
We make use of a single submodule, which contains a dump of the
Django static files for the administration panel, as well as the
IATI.cloud frontend and streamsaver (used to stream large files to a
user). To update the IATI.cloud frontend, create a fresh build from the
frontend
repository, and replace the files in the submodule. Specifically, we
include the ./build folder, and copy the
./build/static/css, ./build/static/js and
./build/static/media directories to the static
submodule.
To update the Django administrator static files, collect the django static, and update the files.
Lastly, StreamSaver is used to stream large files to the user.
Django is used to host a management interface for the Celery tasks, this was formerly used to host an API.
celery, combined with flower, django-celery-beat, and django-celery-results is used to manage multitask processing.
psycopg2-binary is used to connect to PostgreSQL.
python-dotenv is used for .env support.
lxml and MechanicalSoup are used for legacy working with XML Documents.
pysolr, xmljson and pymongo are used to support the direct indexing to Solr process.
flake8 is used to maintain code quality in pep8 style
isort is used to maintain the imports
pre-commit is used to enforce commit styles in the form
feat: A new feature
fix: A bug fix
docs: Documentation only changes
style: Changes that do not affect the meaning of the code (white-space, formatting, missing semi-colons, etc)
refactor: A code change that neither fixes a bug nor adds a feature
perf: A code change that improves performance
test: Adding missing or correcting existing tests
chore: Changes to the build process or auxiliary tools and libraries such as documentation generationWe test with pytest,and use coverage to
generage coverage reports. You can use . scripts/cov.sh to
quickly run all tests and generate a coverage report. This also
conveniently prints the location of the coverage HTML report, which can
be viewed from your browser.
Yes! We are mainly looking for coders to help on the project. If you are a coder feel free to Fork the repository and send us your amazing Pull Requests!
Python already has clear PEP 8 code style guidelines, so it’s difficult to add something to it, but there are certain key points to follow when contributing:
flake8 OIPA.pytestgit+https://github.com/Supervisor/supervisor@ec495be4e28c694af1e41514e08c03cf6f1496c8#egg=supervisor),
so if the library is updated, it doesn’t break everything& many others
main - production ready codebasedevelop - completed but not yet released changesarchive/iati-cloud-hybrid-django-solr - django based
“OIPA” version of IATI.cloud. Decommissioned around halfway through
2022.Other branches should be prefixed similarly to commits, like
docs/added-usage-readme
We provide an index file, which
serves as a front facing page for iati.cloud. Currently, the index is
created with pandoc, by combining the README and the markdown files in
./docs.
To update the index:
sudo apt-get update && sudo apt-get install -y pandocbash scripts/update_docs_index.sh from the
IATI.cloud root directory. Or do it manually with:cat README.md ./docs/*.md > ./docs/combined.md
pandoc -s --metadata title="IATI.cloud Documentation" -o ./docs/index.html ./docs/combined.md
rm ./docs/combined.mdEnsure this is pushed to the correct branch or change the branch on github -> settings -> pages. # Installing and running IATI.cloud with Docker
Run the setup script from the IATI.cloud root directory
sudo bash scripts/setup.shNotes:
Y to the confirmation requests. This will
ensure your setup will be complete and consistently reproducible.test.iati.cloud or
iaticloud.example.com.We want to have a full stack IATI.cloud application with the above specifications running. This includes Django, RabbitMQ and Celery, along with a postgres database, mongodb for aggregation, Apache Solr for document indexing, and lastly NGINX as a web server.
To accomplish this, we have created a docker-compose.yml configuration file, which starts all of the services. Each “cog in the system” is it’s own runnable docker container.
The services use the default docker compose network. Each service
registers itself to the network through the service name. This allows
the docker containers to connect to eachother. Where locally you would
use localhost:5432, a docker container connecting to a
PostgreSQL container would refer to database:5432. By
providing a port like ports: 8000:8000, you allow the
localhost port 8000 to connect through to the docker container’s port
8000.
Please check out the environment variable reference in the local installation documentation. They are the same with the exception of the host IPs which are the services as explained above.
| service | network name | ports | image | Additional notes |
|---|---|---|---|---|
| database | database | 5432 | postgres:latest | Using the POSTGRES_ fields in .env to set up and access.
POSTGRES_USER, POSTGRES_PASSWORD,
POSTGRES_DB, self-explanatory default values for the user,
password and database name. We mount
/var/lib/postgresql/data to our db_data docker
‘volume’, which is persisted, meaning the container can be stopped and
started without losing data. |
| rabbitmq | rabbitmq | 5672,15672 | rabbitmq:latest | We mount /var/lib/rabbitmq to our
rabbitmq_data docker ‘volume’, which is persisted (as
above). |
| mongo | mongo | 27017 | mongo:latest | Accessed through mongodb://USER:PASS@mongo:27017 where
USER and PASS are set in the MONGO_INITDB_ fields in .env.
We mount /data/db to our mongo_data docker
‘volume’, which is persisted (as above). |
| solr | solr | 8983 | bitnamilegacy/solr:9.8.1-debian-12-r9 | Using bitnami instead of default solr because of the env options.
We’re mounting the /bitnami directory to either the
solr_data docker volume, or a local directory through the environment
variable SOLR_VOLUME, which allows us to manipulate the
core configuration. We pass SOLR_CORES with a list of all our cores. We
pass SOLR_OPTS containing memory options. We’re using
SOLR_ADMIN_USERNAME and *_PASSWORD to use
authentication. |
| iaticloud | iaticloud | 8000 | . (local Dockerfile) | We build a Docker image with our IATI.cloud codebase. This image
installs the requirements, Java 11
(for the Solr post tool), and runs the entrypoint. The
entrypoint waits for the depended services to be fully started, then
checks if this is the initial run of the IATI.cloud container. If not,
it sets up the static files, sets up the database and sets up the
superuser with the DJANGO_SUPERUSER_* .env variables. |
| celeryworker | none | ports | . (local Dockerfile) | This runs on the iaticloud docker image. It runs main
celery workers with N concurrency where N is the n.o. cores in the
available CPU. |
| celeryrevokeworker | none | ports | . (local Dockerfile) | This runs on the iaticloud docker image. It runs a
single celery worker named Revoke to cancel all tasks |
| celeryscheduler | none | ports | . (local Dockerfile) | This runs on the iaticloud docker image. It runs celery
beat |
| celeryflower | none | 5555 | . (local Dockerfile) | This runs on the iaticloud docker image. It runs celery
flower task management interface, uses the password and username from
CELERYFLOWER_ prefixed .env fields |
| nginx | nginx | 80 | ./services/nginx | Runs NGINX and enables the flower and datastore subdomains for a
provided domain. For local development it also allows subdomains.
Customize SOLR_AUTH_ENCODED and IC_DOMAIN.
iati.cloud-redirect is available but not enabled by default. The docker
image is more described here. |
We recommend using the ./scripts/setup.sh script to get
everything set up for you, then running
sudo docker compose up -d to start the required
processes.
The following is a description of all the steps required to set up IATI.cloud through docker:
iaticloud docker image, to ensure
proper building for usage in all celery services.If you are looking for manual steps to installation, follow the chain of function in the scripts starting at setup.sh, or read up on the scripts that are available in the available scripts documentation.
This assumes the setup has been done.
Start the entire stack with:
sudo docker compose up -dStopping the docker containers:
sudo docker compose downRestarting
sudo docker compose down
sudo docker compose up -dFor example, after updating the version of PostgresDB.
sudo docker compose build <SERVICE_NAME>For example, after changing the sector code from a
pdouble to a pint in the budget
core’s managed-schema file.
sudo docker compose up -d solr
sudo direct_indexing/solr/update_solr_cores.sh
sudo docker compose down
note: this should only be done on empty cores. otherwise, your core might be unable to start the updated core. Use the clear_all_cores task in Django admin.
sudo docker images
sudo docker image rm <ID>sudo docker exec -it <SERVICE_NAME> /bin/bashsudo docker logs <SERVICE_NAME>or, to get live updating logs
sudo docker logs <SERVICE_NAME> -f--detach or -d to detach the docker
containers from the current terminal.--build to rebuild the images.-f to get live updates of logs.Check out the Usage guide for your next steps. # Installing IATI.cloud locally with all dependencies
The following is split up into two sections. The first is an installation guide to the services that are required for IATI.cloud, like python and solr. However historically we have seen that across systems installations differ nearly every time, and therefore this guide is not considered complete. Use it as a guideline, rather than a step by step guide. Of course, google is your friend, and installation guides can be found for most if not all systems.
The second part is a setup guide, which explains which steps to take to get your IATI.cloud instance up and running.
Alternatively, you can use docker locally as well. Read the Docker installation and setup guide.
sudo add-apt-repository ppa:deadsnakes/ppa
sudo apt update
sudo apt install python3.11sudo apt-get install postgresql
sudo systemctl enable postgresql.servicesudo apt-get install gnupg
wget -qO - https://www.mongodb.org/static/pgp/server-6.0.asc | sudo apt-key add -
echo "deb [ arch=amd64,arm64 ] https://repo.mongodb.org/apt/ubuntu focal/mongodb-org/6.0 multiverse" | sudo tee /etc/apt/sources.list.d/mongodb-org-6.0.list
sudo apt-get update
sudo apt install -y mongodb
sudo systemctl enable mongod.servicesudo apt-get install -y erlang
sudo apt-get install rabbitmq-server
sudo systemctl enable rabbitmq-server.serviceAlternative RabbitMQ installation guide for Ubuntu Linux
# Install java
sudo apt-get update
sudo apt-get install openjdk-11-jdk openjdk-11-jre
cat >> /etc/environment <<EOL
JAVA_HOME=/usr/lib/jvm/java-11-openjdk-amd64
JRE_HOME=/usr/lib/jvm/java-11-openjdk-amd64/jre
EOL
# Install solr
cd /opt
wget https://archive.apache.org/dist/lucene/solr/9.8.1/solr-9.8.1.tgz
tar xzf solr-9.8.1.tgz solr-9.8.1/bin/install_solr_service.sh --strip-components=2
sudo bash ./install_solr_service.sh solr-9.8.1.tgz

# Create required solr cores
sudo su - solr -c "/opt/solr/bin/solr create -c activity -n data_driven_schema_configs"
sudo su - solr -c "/opt/solr/bin/solr create -c budget -n data_driven_schema_configs"
sudo su - solr -c "/opt/solr/bin/solr create -c dataset -n data_driven_schema_configs"
sudo su - solr -c "/opt/solr/bin/solr create -c organisation -n data_driven_schema_configs"
sudo su - solr -c "/opt/solr/bin/solr create -c publisher -n data_driven_schema_configs"
sudo su - solr -c "/opt/solr/bin/solr create -c result -n data_driven_schema_configs"
sudo su - solr -c "/opt/solr/bin/solr create -c transaction -n data_driven_schema_configs"
sudo su - solr -c "/opt/solr/bin/solr create -c draft_activity -n data_driven_schema_configs"
sudo su - solr -c "/opt/solr/bin/solr create -c draft_budget -n data_driven_schema_configs"
sudo su - solr -c "/opt/solr/bin/solr create -c draft_result -n data_driven_schema_configs"
sudo su - solr -c "/opt/solr/bin/solr create -c draft_transaction -n data_driven_schema_configs"

sudo cp ./direct_indexing/solr/cores/activity/managed-schema /var/solr/data/activity/conf/managed-schema.xml
sudo cp ./direct_indexing/solr/cores/budget/managed-schema /var/solr/data/budget/conf/managed-schema.xml
sudo cp ./direct_indexing/solr/cores/dataset/managed-schema /var/solr/data/dataset/conf/managed-schema.xml
sudo cp ./direct_indexing/solr/cores/organisation/managed-schema /var/solr/data/organisation/conf/managed-schema.xml
sudo cp ./direct_indexing/solr/cores/publisher/managed-schema /var/solr/data/publisher/conf/managed-schema.xml
sudo cp ./direct_indexing/solr/cores/result/managed-schema /var/solr/data/result/conf/managed-schema.xml
sudo cp ./direct_indexing/solr/cores/transaction/managed-schema /var/solr/data/transaction/conf/managed-schema.xml
sudo cp -r ./direct_indexing/solr/cores/activity/xslt /var/solr/data/activity/conf/
sudo cp ./direct_indexing/solr/cores/activity/managed-schema /var/solr/data/draft_activity/conf/managed-schema.xml
sudo cp ./direct_indexing/solr/cores/budget/managed-schema /var/solr/data/draft_budget/conf/managed-schema.xml
sudo cp ./direct_indexing/solr/cores/result/managed-schema /var/solr/data/draft_result/conf/managed-schema.xml
sudo cp ./direct_indexing/solr/cores/transaction/managed-schema /var/solr/data/draft_transaction/conf/managed-schema.xml

sudo sed -i 's/<int name="maxFields">1000<\/int>/<int name="maxFields">2000<\/int>/' /var/solr/data/activity/conf/solrconfig.xml
sudo sed -i 's/<int name="maxFields">1000<\/int>/<int name="maxFields">2000<\/int>/' /var/solr/data/budget/conf/solrconfig.xml
sudo sed -i 's/<int name="maxFields">1000<\/int>/<int name="maxFields">2000<\/int>/' /var/solr/data/result/conf/solrconfig.xml
sudo sed -i 's/<int name="maxFields">1000<\/int>/<int name="maxFields">2000<\/int>/' /var/solr/data/transaction/conf/solrconfig.xml
sudo sed -i 's/<int name="maxFields">1000<\/int>/<int name="maxFields">2000<\/int>/' /var/solr/data/draft_activity/conf/solrconfig.xml
sudo sed -i 's/<int name="maxFields">1000<\/int>/<int name="maxFields">2000<\/int>/' /var/solr/data/draft_budget/conf/solrconfig.xml
sudo sed -i 's/<int name="maxFields">1000<\/int>/<int name="maxFields">2000<\/int>/' /var/solr/data/draft_result/conf/solrconfig.xml
sudo sed -i 's/<int name="maxFields">1000<\/int>/<int name="maxFields">2000<\/int>/' /var/solr/data/draft_transaction/conf/solrconfig.xml
Then, run nano /opt/solr/bin/solr and add
SOLR_JAVA_MEM="-Xms20g -Xmx20g" or alternatively, however
much memory you choose to assign. Then, run
nano /opt/solr/server/etc/jetty.xml and change in LINE
71:
<Set name="requestHeaderSize"><Property name="solr.jetty.request.header.size" default="8192" /></Set>
TO
<Set name="requestHeaderSize"><Property name="solr.jetty.request.header.size" default="65535" /></Set>
And restart Solr
sudo service solr restartEnsure the following services are running:
Make sure to set up your local .env file, we’ve provided an example under .env.example.local. The following is a table of fields in the .env file, their function and whether or not to change them.
| Field name | Subsystem | Functionality | Changeable (No/Optional/Must) |
|---|---|---|---|
SECRET_KEY |
Django | Secret key | Must |
DEBUG |
Django | Impacts django settings | Optional: change on production to False |
FRESH |
Direct Indexing | Determines if a new dataset is downloaded | Optional |
THROTTLE_DATASET |
Direct Indexing | Reduces the number of datasets indexed, can be used to have a fast local run of the indexing process. | Optional: False in production |
DJANGO_STATIC_ROOT |
Django | Determines where Django static files are served | Optional: for local development |
DJANGO_STATIC_URL |
Django | Determines where Django static files are served | Optional: for local development |
POSTGRES_HOST |
Postgres | Host ip | Optional |
POSTGRES_PORT |
Postgres | Host port | Optional |
POSTGRES_DB |
Postgres | Initial db name | Optional |
POSTGRES_USER |
Postgres | Root user name | Must |
POSTGRES_PASSWORD |
Postgres | Root user pass | Must |
CELERY_BROKER_URL |
Celery | Connection to the message broker like RabbitMQ. Form:
ampq://<RABBITMQ HOST IP> |
Optional: Depends on your broker |
FCDO_INSTANCE |
Direct Indexing | Enables additional indexing features such as GBP conversion and JSON dump fields | Optional: enable on FCDO instances |
SOLR_ADMIN_USERNAME |
Solr | Admin username | Must |
SOLR_ADMIN_PASSWORD |
Solr | Admin password | Must |
SOLR_BASE_URL |
Solr | The connection string from python to solr. (Substitute ports if
necessary.) Form with auth:
http://<SOLR_ADMIN_USERNAME>:<SOLR_ADMIN_PASSWORD>@<SOLR HOST IP>:8983/solr,
or without: http://<SOLR HOST IP>:8983/solr |
Optional: If authentication is enabled |
SOLR_AUTH_ENCODED |
NGINX | A Base64 encoding of
<SOLR_ADMIN_USERNAME>:<SOLR_ADMIN_PASSWORD>. We
use base64encode.org. |
Must |
MEM_SOLR_MIN |
Solr | The minimum available Solr memory | Optional |
MEM_SOLR_MAX |
Solr | The maximum available Solr memory | Optional |
SOLR_VOLUME |
Solr | Either the ‘docker volume’ solr_data, or a local mount directory like “SOLR_VOLUME=”/my/storage/iati.cloud/direct_indexing/solr_mount_dir” | Optional |
CELERYFLOWER_USER |
Celery | Flower access | Must |
CELERYFLOWER_PASSWORD |
Celery | Flower access | Must |
DJANGO_SUPERUSER_USERNAME |
Django | Initial superuser account | Must |
DJANGO_SUPERUSER_PASSWORD |
Django | Initial superuser account | Must |
DJANGO_SUPERUSER_EMAIL |
Django | Initial superuser account | Must |
MONGO_INITDB_ROOT_USERNAME |
MongoDB | Initial superuser account | Must |
MONGO_INITDB_ROOT_PASSWORD |
MongoDB | Initial superuser account | Must |
MONGO_INITDB_DATABASE |
MongoDB | Default MongoDB database. This is not changeable, but is required for the initialisation of MongoDB in fresh starts in docker. | No, this must remain activities |
MONGO_CONNECTION_STRING |
MongoDB | mongodb://<MONGO_INITDB_ROOT_USERNAME>:<MONGO_INITDB_ROOT_PASSWORD>@<MONGO HOST IP>:27017 |
Must |
IC_DOMAIN |
NGINX | The domain on which the current IATI.cloud setup is deployed, localhost in development, iati.cloud in production | Optional, in production with domain pointed at the server |
CSRF_TRUSTED_ORIGINS |
Django | Django trusted origins, like https://iati.cloud for
iati.cloud. “A list of trusted origins for unsafe requests
(e.g. POST).” |
Must |
Install create a virtual environment
python3.11 -m venv ./envActivate environment
source ./env/bin/activateUpgrade pip
pip install --upgrade pipCreate a PostgreSQL database with name, username and password (example default values below)
sudo -u postgres psql

create database iati_cloud;
create user iati_cloud with encrypted password 'oipa';
grant all privileges on database iati_cloud to iati_cloud;
Run the initial migration
python manage.py migrateCreate a Django Admin user
python manage.py createsuperuserEnter a username and a password. Emails are not required but feel free to use yours.
Preload the legacy currency conversion with data
python manage.py loaddata ./services/iaticloud/data_preload/legacy_currency_convert_dump.jsonRun the django server:
python manage.py runserverRun celery workers:
celery -A iaticloud worker -l INFO --concurrency=32 -n worker@%%hOptionally run celery revoke queue:
celery -A iaticloud worker -l INFO -n revoke@%%h -Q revoke_queueOptionally run celery aida workers
celery -A iaticloud worker -l INFO --concurrency=4 -n aida@%%h -Q aida_queueRun celery beat
celery -A iaticloud beat -l INFORun celery flower
celery -A iaticloud flower -l INFO --port=5555Check out the Usage guide for your next steps. # IATI.cloud dataset processing
The following is an explanation of the dataset processing flow for IATI.cloud.
We use the code4iati dataset metadata and publisher metadata dumps to access all of the available metadata.
Publisher: We basically immediately index the publisher metadata as it is flat data.
Dataset: We download the code4iati dataset dump to access all of the
available IATI datasets from the IATI Registry. If update
is true, we check whether or not the hash has changed from the already
indexed datasets. We then loop the datasets within the dataset metadata
dump and trigger the subtask_process_dataset. For each
dataset we clean the dataset metadata (where we extract the nested
resources and extras). We then retrieve the
filepath of the actual downloaded dataset based on the organisation name
and dataset name. We check if the version is valid (in this case version
2). We get the type of the file from the metadata or the file content
itself. We then check the dataset validation. Then we clear the existing
data from this dataset if it is found in the IATI.cloud and the
update flag is True. Then we trigger the indexing of the actual dataset. Once
this is completed we store the success state of the latter to
iati_cloud_indexed and we index the entire dataset
metadata.
First, we parse the IATI XML dataset. We then convert it to a dict using the BadgerFish algorithm.
We apply our cleaning and add custom fields. We then dump the dataset dict into a JSON file. Latstly, we extract the subtypes (budget, result and transactions)
We then recursively clean the dataset. @ values are
removed, @{http://www.w3.org/XML/1998/namespace}lang is
replaced with lang, and key-value fields are extracted. View the dataset cleaning
implementation.
We have several “custom fields” that we enrich the IATI data with.
transaction-type.code: 3. We then enrich the activity with
transaction-type.name: Disbursement.policy-marker.combined which is
the policy marker code and its connected significance together.View detailed custom fields implementation
We extract the subtypes to single valued fields. View the activity subtypes extraction implementation.
Each of these is indexed separately into its respective core.
Lastly, if the previous steps were all successful, we index the IATI activity data.
scripts/setup/nginx_host_machine contains
the Nginx configuration for iati.cloudtests/direct_indexing contains the tests
for the direct_indexing module.legacy_currency_convert: The original IMF rate parser
that was implemented before the full IATI.cloud rewrite, and reused for
currency conversion. Work from tasks.pydirect_indexing: The IATI.cloud rewrite result,
originally, datasets were processed into a Django postgres database,
after which the dataset was retrieved and converted to a Solr dataset.
This can be reviewed under the git branch
archive/iati-cloud-hybrid-django-solr. The main entrypoint
here is tasks.py.There are many scripts available. The following is a table displaying their function. For intricate details, use the -h or –help flag when running the script with bash, or simply open the scripts and read.
| Script name | Category | Function | Sudo (root access) required |
|---|---|---|---|
| build.sh | Docker core | Simple trigger for docker compose build |
Yes |
| clear_celery_queues.sh | Utility | Clear all items in all celery queues | Yes |
| cov.sh | Development | Run the tests written for the ./direct_indexing module | No |
| download_fcdo.sh | Utility | Based on requests by FCDO, re-downloads FCDO datasets | No |
| restart.sh | Development | Restart the docker services based on the python code, to immediately utilise the latest code as written locally. | Yes |
| select_env.sh | Utility | Activates the desired environment in case of having multiple environments present. | No |
| setup.sh | Setup | Main setup script, triggers subscripts after asking if they should be triggered | Yes |
| setup/install_cockpit | Setup | Installs cockpit |
Yes |
| setup/install_docker | Setup | Installs docker |
Yes |
| setup/install_nginx | Setup | Installs NGINX and Certbot, optionally
triggers nginx and certbot setups. |
Yes |
| setup/install_submodules | Setup | Inits and updates the git submodule, copies the static directory for the Django admin panel | No |
| setup/setup_environment | Setup | Creates .env files, symlinks the selected one, requests information such as usernames and passwords and updates the .env files | No |
| setup/setup_nginx | Setup | Updates the machine’s Nginx configuration with the required information | Yes |
| setup/setup_solr_mount_dir | Setup | Creates the solr_data directory where the user wants to mount their solr data. | Yes |
| setup/setup_solr | Setup | Creates and triggers the configuration of the Solr docker image | Yes |
| setup/setup_ssl | Setup | Sets up SSL certificates for the Nginx configuration | Yes |
| setup/setup_swap | Setup | Sets up swap space | Yes |
| start.sh | Docker core | Starts specified services | Yes |
| stop.sh | Docker core | Stops specified services | Yes |
| update_solr_cores.sh | Utility | Updates the solr cores with updated configuration | Yes |
| util.sh | Utility | Contains utility functions for use across scripts directory, never accessed directly as it has no function | No |
This file will contain a guide to how to use IATI.cloud as an administrator, from zero to a fully indexed IATI dataset, as well as some tips on querying data.
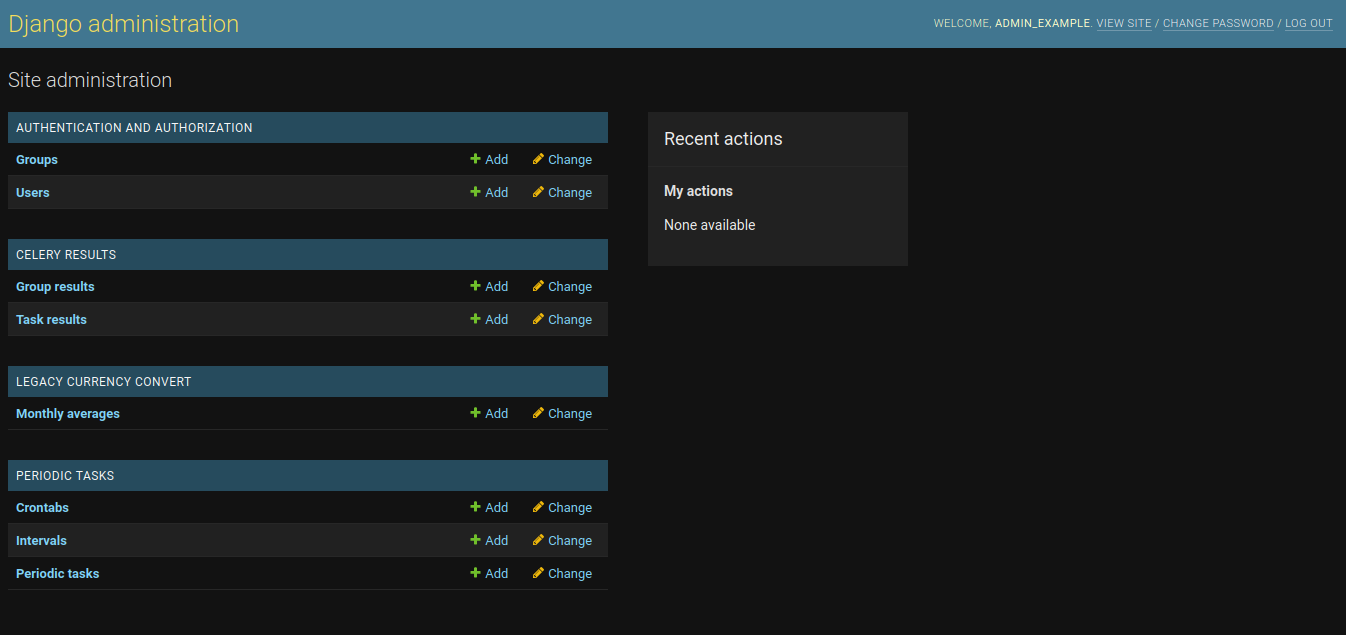
The IATI.cloud process is managed from Django. In the Django admin interface you can trigger the ‘Periodic tasks’, which execute things like clearing all of the Solr cores, indexing the entire IATI dataset, or indexing subsets, more about this in tasks.
The Django Administration interface, as seen in appendix 1 contains some user management, celery results, legacy currency convert and periodic tasks.
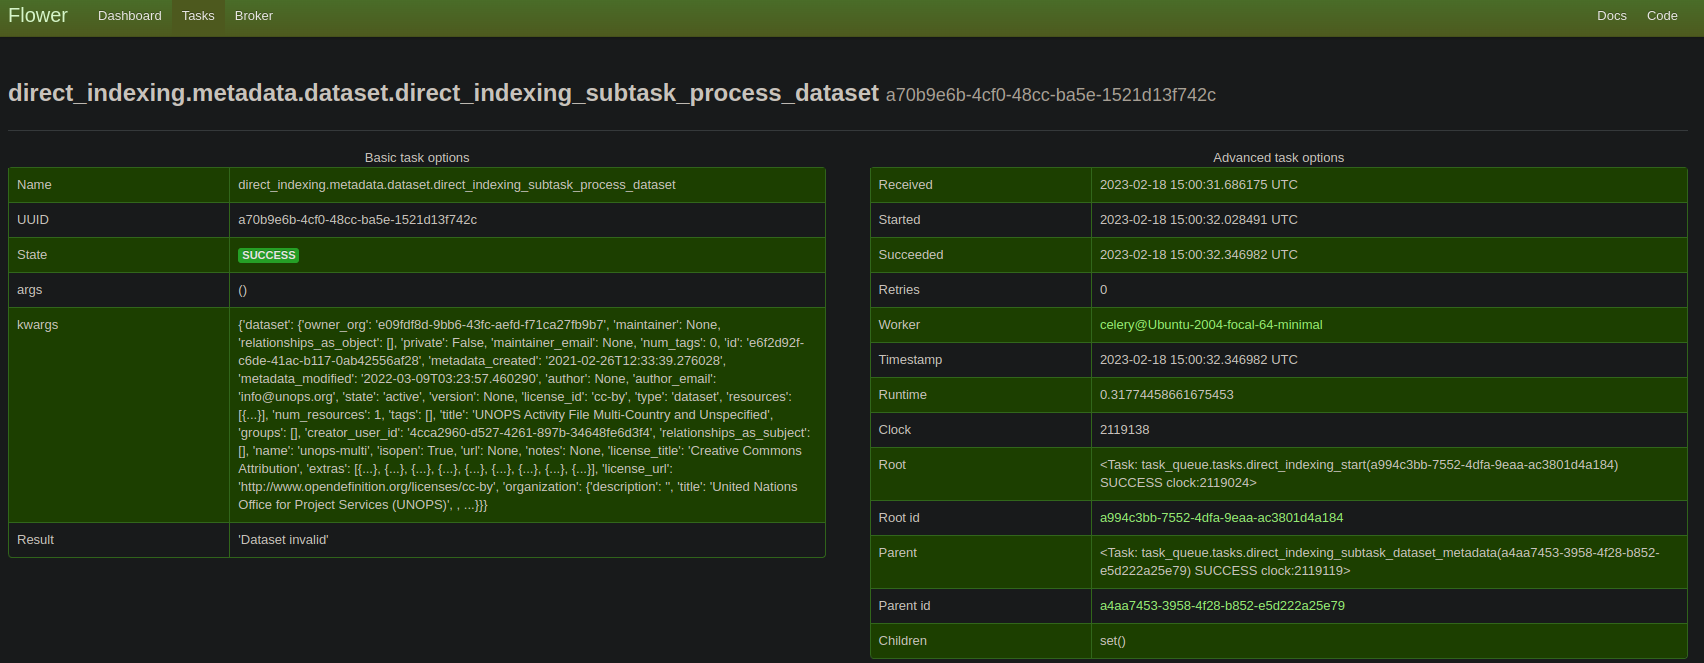
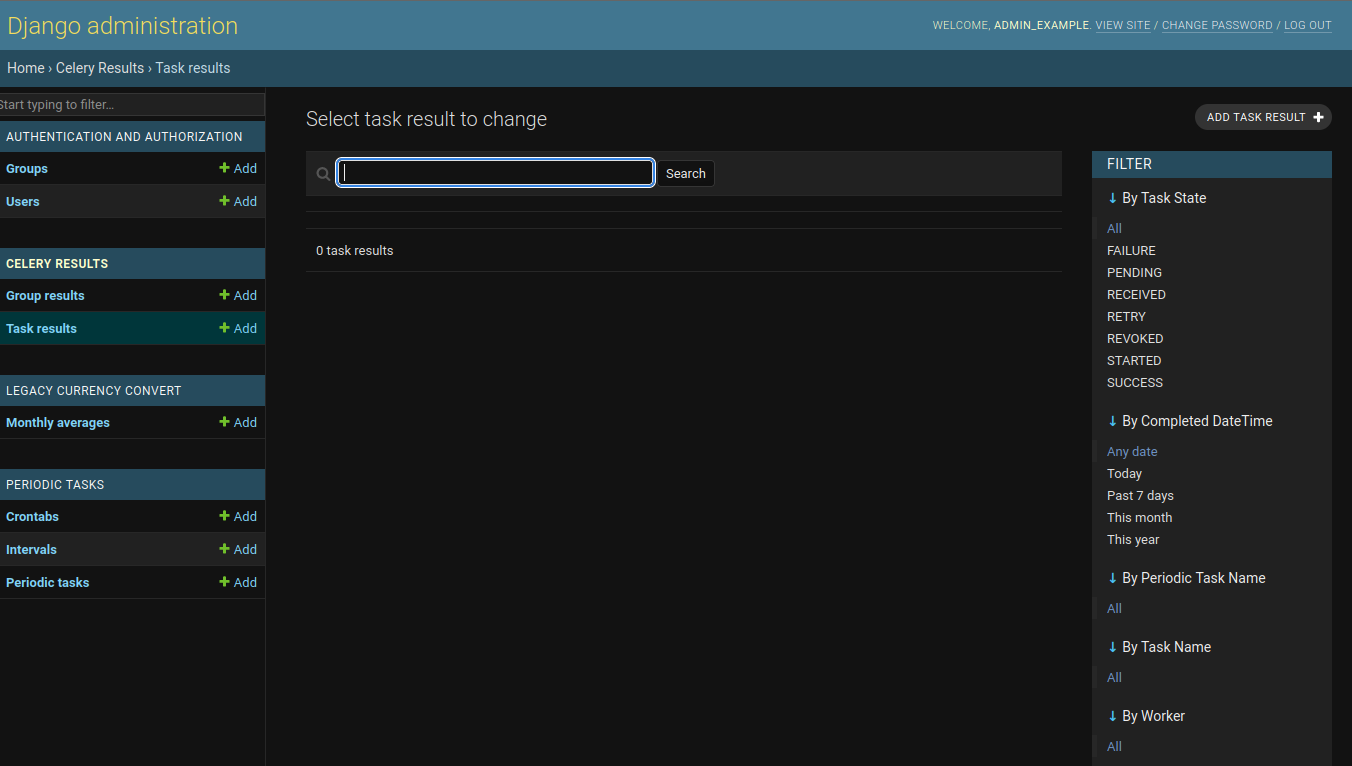
The django celery results page is similar to the Celery Flower interface, the interface shows all of the dispatched tasks and their states. Results can be read here as well. In the Celery Flower interface you can also terminate running tasks, in case of necessity. These interfaces should be used to inspect tasks and task results.
This is a feature that was developed initially for the IATI.cloud to enable currency conversion. It is a best-effort using the International Monetary Fund’s (IMF) monthly exchange rates in the form of SDR per currency unit, to extract as many conversion data points as possible, and converting the values that are in IATI Datasets at the exact value-date, meaning the conversion is applied at the moment of the value’s activity, rather than “now” resulting in more accurate conversion of the value.
To manage tasks in IATI.cloud, you will want to go to
host:8000/admin/django_celery_beat/periodictask/, or simply
https://iati.cloud/admin/django_celery_beat/periodictask on
a live environment, substituting iati.cloud with your domain.
If the following core tasks do not exist, create them. The core tasks are:
direct_indexing.tasks.clear_all_cores{}direct_indexing.tasks.start{"update": 1}direct_indexing.tasks.start{"update": 1}If the final task is enabled, every 3 hours, IATI.cloud will update to contain the latest found IATI data files.
| Task | Interface name | Functionality | Setup and arguments |
|---|---|---|---|
| celery.backend_cleanup | celery.backend_cleanup | Cleans up Celery backend | Automatic setup, every day on a crontab schedule |
| legacy_currency_convert.tasks.update_exchange_rates | Update the exchange rates | Updates the exchange rates using legacy currency convert | Automatic setup, every day on a crontab schedule |
| legacy_currency_convert.tasks.dump_exchange_rates | Dump exchange rates | Creates a JSON file for the direct indexing process | This is a subtask which is used by the system, not necessary as a runnable task |
| direct_indexing.metadata.dataset.subtask_process_dataset | Process dataset metadata | Starts the indexing of a provided dataset, updates the existing dataset in Solr if necessary | This is a subtask which is used by the system, not necessary as a
runnable task. arguments: - dataset: a dataset metadata dict - update: a boolean flag whether or not to update the dataset. |
| direct_indexing.tasks.aida_async_drop | AIDA Drop data | Remove provided (draft) data, possible through Django admin, but
meant to be used by the Django url host:8000/aida/drop |
arguments: -ds_name: literal name of the dataset. -draft: (optional), if 1, the data is dropped from the draft core. |
| direct_indexing.tasks.aida_async_index | AIDA Index data | Index provided (draft) data, possible through Django admin, but
meant to be used by the Django url
host:8000/aida/index |
arguments: -dataset: Json IATI registry dataset metadata. -publisher: name of the publisher. -ds_name: name of the dataset. -ds_url: url of the dataset to be downloaded. -draft: (optional), if 1, the data is dropped from the draft core. |
| direct_indexing.tasks.clear_all_cores | Clear all cores | Removes all of the data from all of the endpoints | Manual setup, every second and tick the one-off task
checkbox. |
| direct_indexing.tasks.fcdo_replace_partial_url | FCDO Replace partial url matches | Used to update a dataset based on the provided URL. For example, if
an existing dataset has the url ‘example.com/a.xml’, and a staging
dataset is prepared at ‘staging-example.com/a.xml’, the file is
downloaded and the iati datastore is refreshed with the new content for
this file. Note: if the setting “FRESH” is active, and the datastore is incrementally updating, the custom dataset will be overwritten by the incremental update. If this feature is used, either disable the incremental updates (admin panel), or set the Fresh setting to false (source code). |
Manual setup, every second and tick the one-off task
checkbox.arguments: - find_url: the url to be replaced - replace_url: the new url |
| direct_indexing.tasks.revoke_all_tasks | Revoke all tasks | Cancels every task that is currently queued (does not cancel tasks currently being executed by Celery Workers). | Manual setup, every second and tick the one-off task
checkbox. |
| direct_indexing.tasks.start | Start IATI.cloud indexing | Triggers an update for the IATI.cloud, downloads the latest metadata and dataset dump, and processes it. | Manual setup, every second and tick the one-off task
checkbox.Alternatively, this can be set up on a crontab schedule every three (3) hours, as the dataset dump updates every three hours (note:remove the one-off task
tick)arguments: - update: a boolean flag which indicates if the IATI.cloud should be updated. If True, the existing activities are updated, if
False, drops all the data from the solr cores and does a
complete re-index.- drop: a boolean flag which indicates whether or not older datasets (no longer available in this indexing cycle) should be removed from IATI.cloud. |
| direct_indexing.tasks.subtask_dataset_metadata | Dataset metadata subtask | Processes and indexes dataset metadata. This process also tringgers a dataset indexing task for every dataset metadata dict | This is a subtask which is used by the system, not necessary as a runnable task |
| direct_indexing.tasks.subtask_publisher_metadata | Publisher metadata subtask | Processes and indexes publisher metadata | This is a subtask which is used by the system, not necessary as a runnable task |
| direct_indexing.tasks.index_custom_dataset | Manually index a dataset with an URL | Manually indexes the provided dataset. The user needs to provide a URL, dataset title, dataset name (no spaces, for example fcdo_set-13 or finland_mfa-001), and organisation name. | Manual setup, every second and tick the one-off task
checkbox.arguments: - url: the string of the XML Dataset URL. - title: A fancy title for the dataset. - name: A no-space dataset name. - org: The organisation name. |
| direct_indexing.tasks.remove_custom_dataset | Manually remove a custom dataset | Removes the provided custom indexed dataset. | Manual setup, every second and tick the one-off task
checkbox.arguments: - dataset_id: The id of the dataset to be removed, can be found in the dataset core. - name: A no-space dataset name. - org: The organisation name. |
IATI.cloud data can be accessed through it’s endpoints:
Here are some tips on how to write effective queries for Solr:
Main interface: 
Specific task result: